Now that Lion has been released, NDA's are lifted and reviews are starting to come in. Here are some choice excerpts:
David Pogue -New York Times:
Quote:
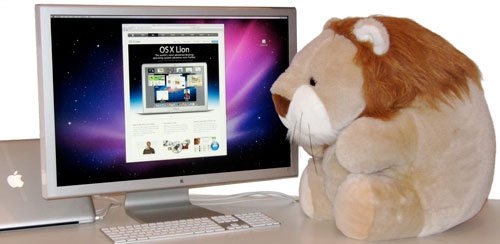
In Mac OS X 10.7, known as Lion, Apple went with the "shake things up" philosophy. It follows an old Apple pattern: embrace what's cool and progressive, and ruthlessly jettison what it considers antiquated. That's great if you love stuff that's cool and progressive, and not so great if you hate people moving your cheese...
The Lion upgrade, in other words, is classic Apple: innovative to some, gimmicky to others, big leaps forward, a few stumbles back. It may never be the king of the jungle. But once the world's software companies have fully Lionized their wares, and once Apple exterminates the bugs, Mac OS X 10.7 might be something even more exotic: a fast, powerful, good-looking, virus-free, thoroughly modern operating system. |
Walt Mossberg -All Things Digital / Wall Street Journal:
Quote:
There are, however, downsides to anything this new and major. In my view, the biggest of these is that switching to Lion will require a major adjustment even for veteran Mac users, though it will be easier for those who use iPhones or iPads. Lion will significantly increase the learning curve for Windows users switching to the Mac...
Lion is very different. It's a big leap, and gives the Mac a much more modern look and feel for a world of tablets and smartphones. If you are willing to adjust, it's the best computer operating system out there. |
Harry McCracken - Time:
Quote:
Most of the highest-profile changes share a unifying principle: They make a Mac feel a little less like a cranky, complicated personal computer, and a little more like a 21st-century appliance...
Lion feels, to revive an old OS X tagline, like a new Mac for your Mac. At $129, it would have been a meaty good value. At $29.99, it's a steal -- the no-brainer upgrade that defines the notion of a no-brainer upgrade. |
John Siracusa -Ars Technica (a staggeringly long review):
Quote:
| Though the Lion name suggests the end of something, the content of the operating system itself clearly marks the start of a new journey. Seemingly emboldened by the success of iOS, Apple has taken a hatchet to decades of conventional wisdom about desktop operating systems. |
Jesus Diaz -Gizmodo:
Quote:
| I love Mac OS X. I've used it since the very first and painful developer preview, back in September 2000. I love iOS too, because its modal nature simplifies powerful computing, and, at the same time, empowers normal people. I hoped Mac OS X Lion was going to merge both perfectly. Sadly, from a user interface point of view, it has failed to achieve that. And by failing at this task, it has made a mess of what was previously totally acceptable. |
Matthew Panzarino -
The Next Web:
Quote:
Yeah, yeah, but should I buy it?
The short answer is yes. OS X Lion offers enough value in its security enhancements and improvements to features like Exposé and Spaces, in the form of Mission Control, to justify the $29.99 price tag alone. There's really very little reason not to purchase the upgrade if you're already a Mac user on Snow Leopard. |
So, Lion appears to be worth $29.99 but as with any dot-zero release, users are encouraged to backup first and be careful about using it for mission-critical applications until Apple -- and your fellow users -- have gotten all the bugs out.
Now that Lion has been released, NDA's are lifted and reviews are starting to come in. Here are some choice excerpts:
David Pogue - New York Times:
Quote:
In Mac OS X 10.7, known as Lion, Apple went with the "shake things up" philosophy. It follows an old Apple pattern: embrace what's cool and progressive, and ruthlessly jettison what it considers antiquated. That's great if you love stuff that's cool and progressive, and not so great if you hate people moving your cheese...
The Lion upgrade, in other words, is classic Apple: innovative to some, gimmicky to others, big leaps forward, a few stumbles back. It may never be the king of the jungle. But once the world's software companies have fully Lionized their wares, and once Apple exterminates the bugs, Mac OS X 10.7 might be something even more exotic: a fast, powerful, good-looking, virus-free, thoroughly modern operating system.
Walt Mossberg - All Things Digital / Wall Street Journal:
Quote:
There are, however, downsides to anything this new and major. In my view, the biggest of these is that switching to Lion will require a major adjustment even for veteran Mac users, though it will be easier for those who use iPhones or iPads. Lion will significantly increase the learning curve for Windows users switching to the Mac...
Lion is very different. It's a big leap, and gives the Mac a much more modern look and feel for a world of tablets and smartphones. If you are willing to adjust, it's the best computer operating system out there.
Harry McCracken - Time:
Quote:
Most of the highest-profile changes share a unifying principle: They make a Mac feel a little less like a cranky, complicated personal computer, and a little more like a 21st-century appliance...
Lion feels, to revive an old OS X tagline, like a new Mac for your Mac. At $129, it would have been a meaty good value. At $29.99, it's a steal -- the no-brainer upgrade that defines the notion of a no-brainer upgrade.
John Siracusa - Ars Technica (a staggeringly long review):
Quote:
Though the Lion name suggests the end of something, the content of the operating system itself clearly marks the start of a new journey. Seemingly emboldened by the success of iOS, Apple has taken a hatchet to decades of conventional wisdom about desktop operating systems.
Jesus Diaz - Gizmodo:
Quote:
I love Mac OS X. I've used it since the very first and painful developer preview, back in September 2000. I love iOS too, because its modal nature simplifies powerful computing, and, at the same time, empowers normal people. I hoped Mac OS X Lion was going to merge both perfectly. Sadly, from a user interface point of view, it has failed to achieve that. And by failing at this task, it has made a mess of what was previously totally acceptable.
Matthew Panzarino - The Next Web:
Quote:
Yeah, yeah, but should I buy it?
The short answer is yes. OS X Lion offers enough value in its security enhancements and improvements to features like Exposé and Spaces, in the form of Mission Control, to justify the $29.99 price tag alone. There's really very little reason not to purchase the upgrade if you're already a Mac user on Snow Leopard.
So, Lion appears to be worth $29.99 but as with any dot-zero release, users are encouraged to backup first and be careful about using it for mission-critical applications until Apple -- and your fellow users -- have gotten all the bugs out.
DVD is the first choice for many people when they want to watch movies at home. It has high quality picture, different subtitles and audio tracks and most important, some of the DVD movies are more enjoyable than than the cinema one.
However, when we travel, when the disc is broken, when we want to backup the DVD movies, when we want to share the movies with friends, when we want to make usage of the movie, what should we do?
Convert DVD to video video formats you need.
This guide aims to show you how to convert DVD to different video format both for windows/mac users.
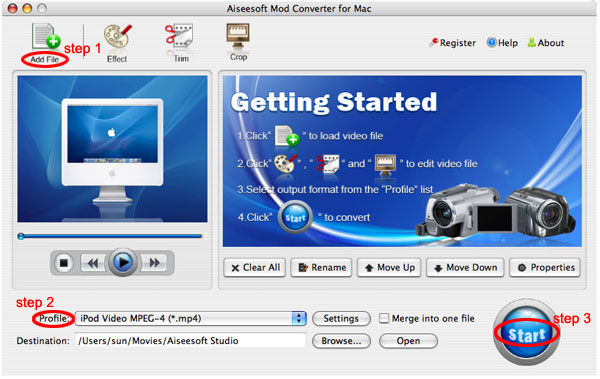
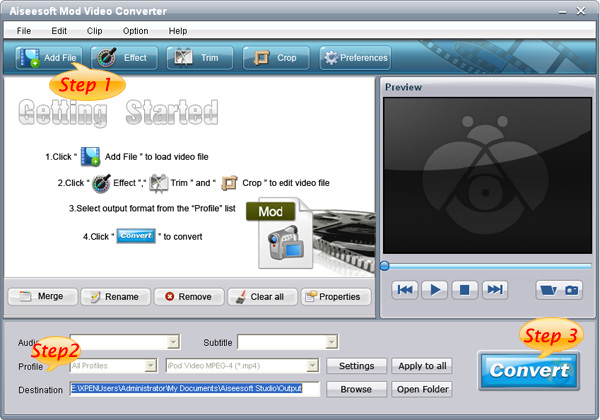
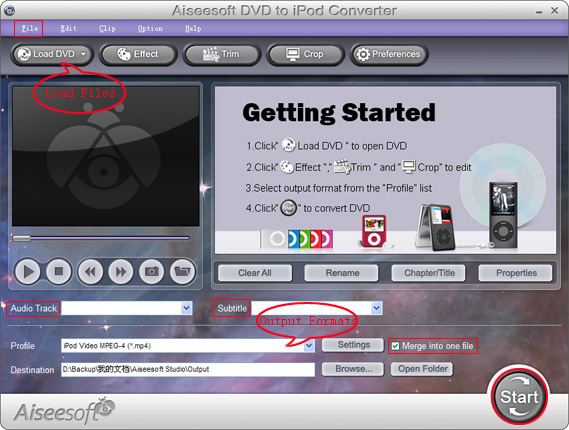
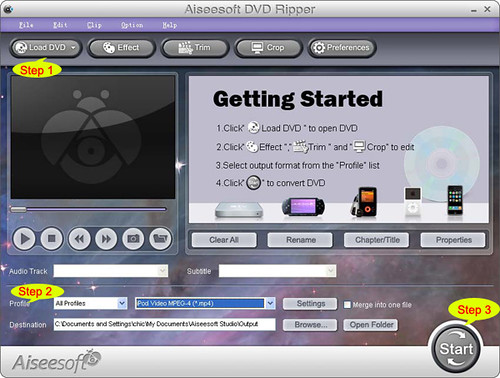
Part 1: How to Convert DVD on Windows with DVD RipperStep 1: Load DVDPut your DVD to your DVD Drive and click “Load DVD” button to add your DVD
Step 2: Choose ProfileChoose your output video profile from a drop-down list.
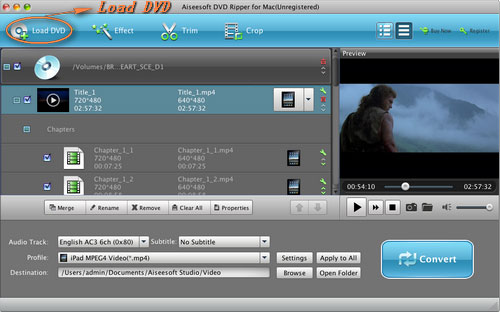
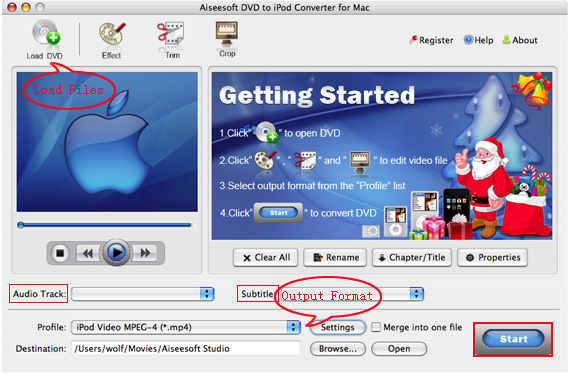
Step 3: Start ConversionPart 2: How to Convert DVD on Mac with DVD Ripper for MacStep 1: Load DVDClick the “Load DVD” button, find the DVD folder of the movie you want to add from your DVD-ROM, and Click “Open”.
Step 2: Choose output profile and settingsSelecting output format is really easy, you can chose your output format according to your devices players and the default setting works great.
For a veteran of digital player, you could customize your own settings by clicking “Settings” button to chose your own video resolution, frame rate, bit rate, encoder, etc.
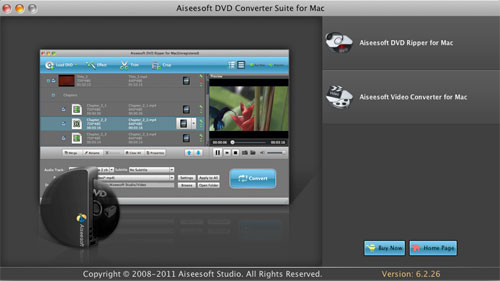
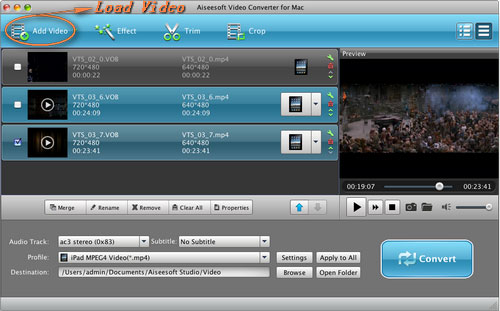
Step 3: Start ConversionIf you want to convert both DVD and videos, here is a really powerful
DVD Converter Suite . It can help you to convert DVD and videos easily. It can also help you to backup the iPod music and videos to your computer.